Learning how to tie a bow with ribbon is useful for gift wrapping, holiday decorating, wreath making, party décor, and small craft projects. A neat ribbon bow can make an ordinary box or basket look more thoughtful and attractive. The basic method is simple, but choosing the right ribbon and adjusting the loops carefully can make a major difference in the final result.
Beginners often struggle with uneven loops, twisted ribbon, loose knots, or messy tails. These problems are normal and usually become easier to fix with practice. This guide explains the basic bow-making process, different ribbon materials, decorative bow styles, and simple troubleshooting methods. You do not need expensive tools or advanced crafting experience to create a clean and balanced bow.
What You Need to Tie a Bow With Ribbon
For a basic ribbon bow, you only need a suitable piece of ribbon and a pair of sharp craft scissors. A ruler or measuring tape can help when you want equal ribbon lengths, although it is not essential. Decorative projects may also use floral wire, a stapler, twist ties, or fabric-safe glue, but a simple gift bow can usually be made without them.
Choose a clean, flat workspace where the ribbon will not become tangled. Adults should supervise children whenever scissors, wire cutters, floral wire, staplers, or hot glue are involved. Keep sharp tools away from the edge of the table and close scissors after use. Start with inexpensive ribbon while practising so that small mistakes do not waste your best decorative material.
How to Choose the Right Ribbon
Different ribbon types behave in different ways. Grosgrain ribbon has a slightly textured surface and is often easy for beginners to hold. Wired ribbon contains thin wire along its edges, helping the loops remain full and shaped. Cotton ribbon feels natural and works well for rustic gifts, baskets, and handmade decorations. Organza is lightweight and creates a soft, transparent appearance.
Satin ribbon looks smooth and elegant, but it can slip while you are tightening the knot. Velvet ribbon feels luxurious but may be thicker and more difficult to fold neatly. Wider ribbon creates larger, fuller bows, while narrow ribbon works well for small gift tags. Choose a ribbon that suits both the project size and the look you want to create.
How Much Ribbon Do You Need?
The amount of ribbon depends on the size of the bow, the number of loops, and whether the ribbon must also wrap around a box. A small gift-tag bow may need only a short piece, while a large decorative bow for a wreath or basket requires considerably more. It is usually better to leave a little extra ribbon than to begin with a piece that is too short.
Ribbon width and ribbon length are different measurements. Width determines how broad and full the bow appears, while length determines the size of the loops and tails. Before cutting expensive ribbon, practise with string or leftover ribbon. You can loosely form the bow, estimate the required length, and then cut the decorative ribbon once you understand how much the project needs.
How to Tie a Bow With Ribbon Step by Step
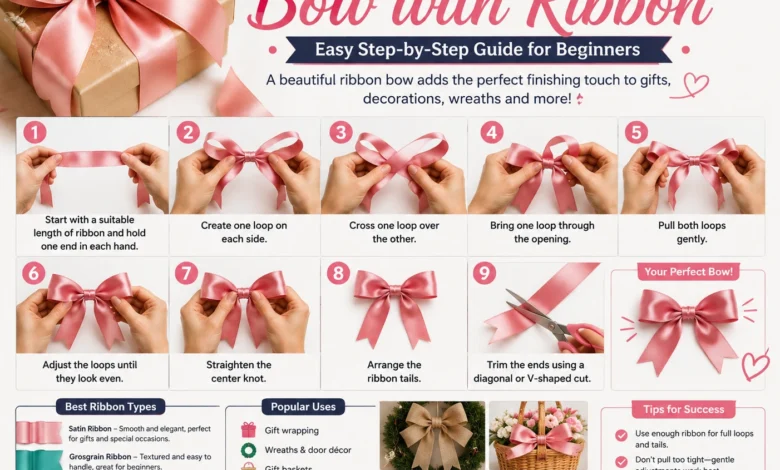
To learn how to tie a bow with ribbon, begin by holding one end in each hand. Create a loop on the left side and another loop on the right side. Cross one loop over the other, creating a small opening in the centre. Push one loop through that opening, much like tying shoelaces, while keeping both loops from twisting.
Pull the loops gently in opposite directions until the centre knot begins to tighten. Do not pull too hard because delicate ribbon can wrinkle or become crushed. Adjust the loops by pulling small sections at a time. Straighten the centre knot, arrange both tails, and check whether the loops appear balanced. Trim the ends only after you are satisfied with the bow’s overall shape.
How to Make Both Bow Loops Even
Uneven loops usually happen because one side receives more ribbon while the knot is being tightened. Instead of starting again immediately, hold the centre knot with one hand. Gently pull the smaller loop outward while allowing a little ribbon to move from its nearest tail. Repeat the same adjustment on the other side until the loops look similar in size.
Avoid pulling only the ribbon tails because this can shrink the loops or undo the bow completely. Work slowly and make small changes. Place the bow on a table to compare both sides from above. Perfect symmetry is not always necessary, especially with soft or rustic ribbon, but balanced loops generally create a cleaner and more professional-looking result.
How to Tie a Bow Around a Gift Box
Wrap the ribbon underneath the gift box and bring both ends to the top. Cross the ends at the centre, then turn the box or change the ribbon direction so it creates a cross-shaped wrap. Bring both ends back to the top and tie a firm basic knot. This knot helps keep the ribbon around the box before you form the decorative bow.
Create one loop in each hand, cross them, and pull one loop through the centre opening. Adjust the bow without pulling the wrapped ribbon too tightly against fragile packaging. A satin bow works well for birthday gifts, while grosgrain or cotton ribbon gives a more casual appearance. Make sure the bow sits in the centre or another intentionally chosen position.
How to Make a Double-Loop Ribbon Bow
A double-loop bow creates a fuller appearance than a basic two-loop bow. Begin with a longer ribbon and form two stacked loops on each side. Pinch the centre tightly while arranging the loops so that each layer remains visible. Secure the centre with a separate narrow ribbon, twist tie, or floral wire if the project requires additional strength.
After securing the centre, gently pull the upper loops upward and the lower loops outward. This creates volume and prevents the layers from sitting directly on top of one another. Double-loop bows work well on gift baskets, large packages, holiday garlands, and table decorations. Wired ribbon is particularly helpful because each loop can be shaped after the centre has been secured.
How to Tie a Bow With Wired or Satin Ribbon
Wired ribbon is one of the easiest materials for decorative bow making. The wire along the edges allows you to curve each loop and keep the bow from looking flat. After tying or securing the centre, place your fingers inside each loop and gently push outward. Bend the ribbon edges slightly until the bow has the desired fullness and shape.
When learning how to tie a bow with ribbon made from satin, work more slowly because the smooth surface can loosen easily. Keep light pressure on the centre knot while adjusting the loops. A small hidden double knot may help secure some satin bows, depending on the project. Avoid over-tightening because satin can crease and lose its smooth, polished appearance.
How to Make a Ribbon Bow for a Wreath
A wreath bow usually looks best when it has multiple loops and longer tails. Wired ribbon is a practical choice because it holds its shape outdoors or during storage more effectively than some soft ribbons. Form several loops of gradually different sizes, pinch them together at the centre, and secure them with floral wire or a strong twist tie.
Attach the finished bow firmly to the wreath frame rather than only to leaves, flowers, or lightweight decorations. Spread the loops so they form a balanced fan shape. Arrange the tails so they hang naturally, and trim them to suitable lengths. When using wire cutters or floral wire, wear eye protection if needed and keep sharp wire ends folded away from hands.
Christmas and Holiday Ribbon Bow Ideas
A Christmas ribbon bow can be made with velvet, plaid, metallic, satin, or wired ribbon. Traditional colours include red, green, gold, silver, and white, but neutral colours can also create an elegant holiday look. Large bows suit wreaths, stair railings, and gift baskets, while smaller bows work well on ornaments, napkins, candles, and gift tags. For seasonal ribbon combinations beyond Christmas, explore this deep autumn colour palette for fall décor featuring warm and rich decorating shades.
For a layered holiday bow, combine two ribbons with different widths or patterns. Place the narrower ribbon over the wider one before forming the loops. Make sure the patterns face outward as you shape the bow. Avoid placing ribbon too close to open flames, heaters, or hot light bulbs. Decorative ribbon is often flammable and should be positioned carefully.
Small Bows and Large Decorative Bows
Small bows are useful for gift tags, favour bags, cards, hair accessories, and table settings. Narrow grosgrain or satin ribbon works well for these projects. Use short tails and small loops so the bow does not overwhelm the item. A fork can sometimes help form very tiny bows, although beginners may find it easier to work directly with their fingers.
Large decorative bows need wider ribbon and stronger centre support. Use wired ribbon for party decorations, baskets, large presents, or door displays. Create several loops instead of making one oversized pair, as multiple loops usually provide better balance. Attach the bow securely, especially when it will be displayed outdoors or in a place where people may accidentally touch it.
How to Stop a Ribbon Bow From Coming Loose
A ribbon bow may come loose when the material is slippery, the centre knot is too weak, or the loops are adjusted too aggressively. Begin with a secure basic knot before making the loops. While tightening the final bow, hold the centre firmly and pull both loops evenly. Satin and organza ribbon may require a slightly firmer knot than textured ribbon.
For permanent decorations, you can secure the back of the centre with floral wire, a twist tie, a hidden stitch, or a small amount of suitable adhesive. Hot glue should only be used by adults who understand safe handling. Decorative bows used on clothing or washable fabric should not be glued unless the material and care instructions allow it.
How to Fix a Flat, Twisted, or Uneven Bow
A flat bow usually needs more shaping rather than a completely new knot. Place your fingers inside each loop and gently open it. Wired ribbon can be curved along the edges, while soft ribbon may need light fluffing. If the centre is too tight, loosen it slightly before reshaping. Avoid crushing the loops while holding the bow.
Twisted ribbon occurs when the wrong side faces outward during folding. Untie the bow slightly and rotate the affected section until the finished side becomes visible. For an uneven bow, transfer a small amount of ribbon between a loop and its nearest tail. These simple adjustments can often improve the appearance without requiring you to start from the beginning.
How to Cut Ribbon Tails Neatly
Ribbon tails can be cut diagonally for a simple finish or shaped into a V-cut, sometimes called a fishtail. To create a V-cut, fold the ribbon tail lengthwise and cut diagonally from the folded edge toward the outer corner. Open the ribbon carefully to reveal two pointed ends. Make sure both tails are similar in length before making the final cuts.
Some ribbon materials fray more easily than others. Fabric-safe fray-prevention products may help, but they should be tested on a leftover piece first. Heat-sealing synthetic ribbon can be dangerous and may release fumes or damage the material, so beginners should avoid it without proper knowledge and safety precautions. Clean, sharp scissors usually create the neatest and safest finish.
Common Ribbon Bow Mistakes
One common mistake is cutting the ribbon before estimating the required length. Another is pulling the knot too tightly, which can crush soft fabric and make the loops difficult to adjust. Beginners may also twist one loop accidentally, place the wrong side of patterned ribbon outward, or trim the tails before the final shape has been completed.
Choosing the wrong ribbon can also make the process more difficult. Very slippery satin may frustrate a first-time crafter, while extremely wide ribbon can feel hard to control. Start with medium-width grosgrain or wired ribbon. Practise the basic movement several times, and reuse imperfect pieces for gift tags, small decorations, or future bow-making practice.
Tips for a Professional-Looking Bow
A professional-looking bow usually has a neat centre, balanced loops, smooth fabric, and carefully trimmed tails. Work on a flat surface and keep the ribbon free from wrinkles. Make small adjustments instead of pulling strongly. If the ribbon has a printed pattern, check that the design faces outward on both loops and tails.
Match the bow size to the item being decorated. A huge bow can overwhelm a small gift, while a tiny bow may disappear on a large basket. Repeat colours already used in the wrapping paper or décor. For example, a gold ribbon can match gold lettering on a gift tag, creating a coordinated appearance without requiring complicated crafting techniques.
Creative Ways to Use Ribbon Bows
Ribbon bows can decorate birthday gifts, wedding favours, holiday wreaths, flower arrangements, storage baskets, party chairs, jars, cards, and table settings. A ribbon-wrapped present can also be paired with these personalised birthday card ideas to make the celebration feel more thoughtful. A small grosgrain bow can improve a simple gift tag, while a soft velvet bow can add warmth to winter décor. Large wired bows can become focal points on doors, staircases, and celebration displays.
Leftover ribbon should not be thrown away automatically. Short pieces can be used for tiny bows, bookmarks, gift tags, scrapbooks, ornaments, or decorative jar lids. Keep similar colours together in a small container. Reusing ribbon reduces waste and gives you inexpensive material for practising new techniques before working with longer or more valuable pieces.
How to Store Finished Ribbon Bows
Finished bows should be stored where their loops will not become crushed. Place large bows in a box with enough space around them, and avoid stacking heavy objects on top. Tissue paper can be placed inside the loops to help them maintain their shape. Keep ribbon away from moisture, direct sunlight, dust, and excessive heat.
Wired bows are usually easier to reshape after storage. Soft satin, velvet, and organza bows may require more careful handling. If a stored bow becomes flat, gently fluff each loop and straighten the tails. Do not iron ribbon unless the care instructions confirm that heat is safe, as some synthetic materials can melt, shine, or become permanently damaged.
Conclusion
Understanding how to tie a bow with ribbon becomes much easier after practising the basic loop, cross, pull, and adjust method. Start with a manageable ribbon type, leave enough length for the loops and tails, and avoid pulling delicate material too tightly. Small corrections can fix most uneven, loose, twisted, or flat bows.
The best bow is not always the most complicated one. A simple, balanced ribbon bow can make a gift, wreath, basket, or decoration look complete. With the correct ribbon, careful shaping, clean tail cuts, and a little patience, beginners can create attractive bows without expensive equipment, large amounts of wasted ribbon, or advanced craft skills.
FAQs
How do you tie a simple bow with ribbon?
Create one loop in each hand, cross one loop over the other, push one loop through the centre opening, and pull gently. Adjust the loops and tails until the bow appears balanced.
How much ribbon do I need to make a bow?
The amount depends on the bow size, number of loops, ribbon width, and tail length. Practise with string or leftover ribbon before cutting your final material.
What ribbon is easiest for beginners?
Grosgrain and wired ribbon are usually easier to control. Wired ribbon holds its shape, while grosgrain has a textured surface that is less slippery than satin.
How do I make both bow loops the same size?
Hold the centre knot and gently pull the smaller loop while allowing ribbon to move from its nearest tail. Make small adjustments on both sides.
Why does my ribbon bow keep coming loose?
The centre knot may be too loose, or the ribbon may be slippery. Begin with a secure knot and keep pressure on the centre while adjusting the loops.
How do I tie a bow around a gift box?
Wrap the ribbon around the box, secure it with a basic knot on top, and then create two loops. Cross the loops and pull one through
the opening.
Can I make a bow with satin ribbon?
Yes. Satin creates an elegant bow, but its smooth surface can slip. Tighten the centre carefully without crushing or wrinkling the ribbon.
Is wired ribbon better for making bows?
Wired ribbon is useful for decorative bows because it keeps loops full and allows reshaping. However, simple gift bows can also be made with unwired ribbon.
How do I make a large decorative ribbon bow?
Use wide wired ribbon, form several loops on each side, pinch the centre, and secure it with floral wire or a strong twist tie.
How do I stop ribbon ends from fraying?
Cut the ribbon with sharp scissors and consider a suitable fabric-safe fray product. Test any product on a leftover piece before applying it.
Can I make a ribbon bow without glue?
Yes. Most simple bows only require a secure knot. Wire, twist ties, thread, or glue are mainly used for permanent or multi-loop decorations.
What can I do with leftover ribbon?
Use leftover pieces for small bows, gift tags, cards, bookmarks, ornaments, jar decorations, scrapbooks, or bow-making practice.